
Author: Zohaib Uddin Khan
For the course of this blog, I’m expecting that the reader has some basic knowledge of Dynamics CRM, while if you don’t know Power BI, then not a big deal. The primary focus of this blog is, how to use Power BI for Custom Entities of Dynamics 365 Online?
What is Power BI?
I recommend you refer to my previous blog about What is Power BI?
Setup Power BI:
- Sign up free for Power BI with your work email address (keep remember your personal email address won’t work such as Hotmail, yahoo, Gmail or etc.). In case, if you don’t have work email address, then create a new Dynamics CRM Online trial and use the newly created *@*.onmicrosoft.com

- Once, you complete the sign-up, you are on the Power BI Landing page.

Download Power BI Desktop:
- In order to bring Custom entities of Dynamics 365 to Power BI, we need the Power BI Desktop to achieve our goal.
- Download Power BI Desktop.
Or
- From Power BI Landing page, on the top right corner you can see the Download icon and select ‘Power BI Desktop’.

- Installation of ‘Power BI Desktop’ is pretty straight-forward. So, I’m not going onto that road.
Download Dynamics 365 Content Pack (Optional but recommended):
- Dynamics 365 Team has shared two content packs, which are:
- Download either one of them or both. I recommend, download both of the them and check how Dynamics 365 team is showing the strength of Power BI?

Use Power BI for Custom Entities of Dynamics 365 Online:
At this point, we have all our necessary items to achieve our goal of this post. So, let’s start the ride.
- Double click on Power BI Desktop,
![]()
- Power BI Desktop will show you a pop-up screen for the ‘Sign-In’. Sign-in with the credentials used in the ‘Setup Power BI’.

- Once, you finish sign-in with your credentials. Click ‘File’ – ‘Open’ and select the ‘Dynamics 365 Content Pack – Sales Manager.pbix’ file. If you want to understand more about the ‘Dynamics 365 Content Pack – Sales Manager’, then check this article.

- In case, you didn’t download the ‘Dynamics 365 Content Pack – Sales Manager’, then click ‘File’ – ‘New’.
- Click on ‘Get Data’, then select ‘More’ under ‘Home’. A new pop-up will appear:

- Search ‘Dynamics’, select ‘Dynamics 365’ component and click on ‘Connect’.

- A new pop-up appear, in which you need to enter your Dynamics 365 OData endpoint URL and click on ‘OK’.

- You can find your Dynamics 365 OData endpoint URL at Settings > Customizations > Developer Resources and locate the URL under Instance Web API.

- A new pop-up will appear, select ‘Organizational Account’ and click on ‘Connect’. In case, you’re not already ‘Sign-in’, then click on ‘Sign-in’ before clicking ‘Connect’.

- In my Dynamics CRM Instance, I’ve created a new custom entity named as ‘Event’. Pretty Simple and straight forward, which you can see from below picture. And, created three records in it.

- In the navigator pop-up, search ‘event’, select ‘new_events’ from the list and click on ‘Load’.

- Then, I bring ‘Stacked Column Chart’ on the Power BI Desktop – Report (by default selected).
- Axis – Location
- Value – Number of Attendees

- Click on File – Save. Once, save click on ‘Publish’ button.

- A successful Publish to Power BI appears. Click on ‘Open Event Report.pbix’ in Power BI.

- In your browser, you are navigated to app.powerbi.com, Select ‘Event Reports’ and on the chart click on Pin.

- A new pop-up appear, select ‘New Dashboard’, enter a name and click on ‘Pin’.

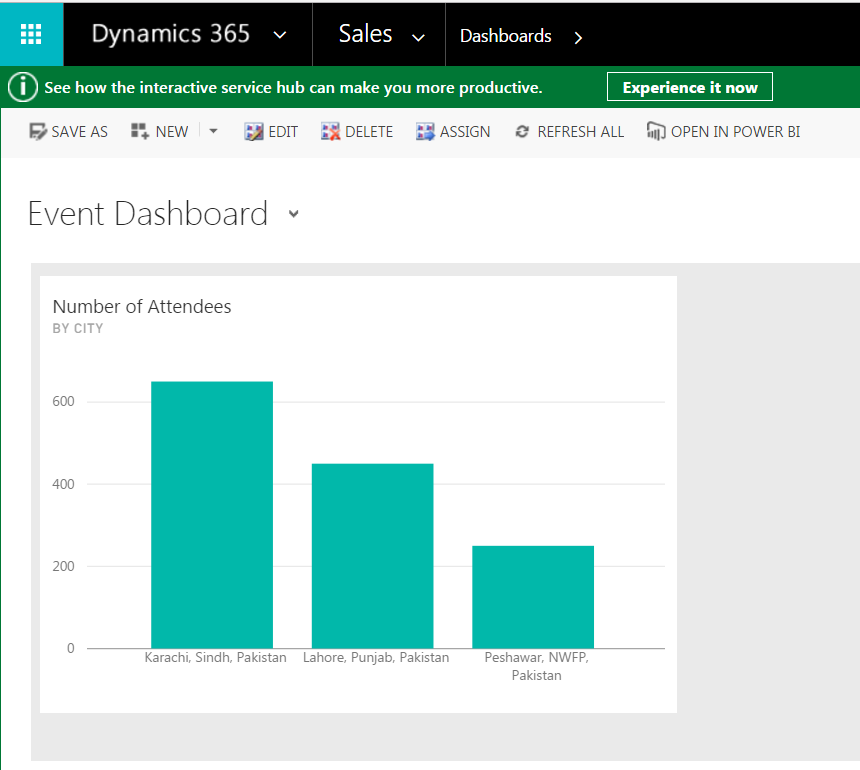
- Now, go to your Dynamics CRM Organization – Sales – Dashboard – Click on ‘New’ button and following options are available:
- Dynamics 365 Dashboard
- Power BI Dashboard
- Select ‘Power BI Dashboard’ and a new pop-up appear, choose ‘Event Dashboard’ and click on ‘Save’ button.

- Viola! Custom Entity chart using Power BI on Microsoft Dynamics 365.

Hi Zohaib,
Thanks for the article. Helped a bunch.
One question, once I get the data into Power BI the costum fields only show the value in the columns listed instead of its label. For example, I have a custom field for vertical. In dynamics the labels are Government, Entertainment, Brands etc, but in Power BI it only shows the corresponding values such as 10000001, 21490000001, 100000007 etc.
Is there any way to make the labels visable instead of the values?
Hi Matt, Thanks for your comments.
In order to resolve your query, check “PowerBI OptionSet Assistant” plugin in XrmToolBox (http://www.xrmtoolbox.com). Using this, you will solve your problem. Thanks.
Dear Zohaib Uddin Khan,
I am new in Power BI, I have to develop the Dashboard for the Dynamics CRM.
I am using Power BI desktop.
I have gone through many post, but of no use. I explain here my scenario. I am taking Project and Service module for dashboard development. I wanted to connect Project entity. I used following link, I am able to view the table but updated data is not there.
https://.api.crm4.dynamics.com/api/data/v9.0/ – it is throwing error.
https://.api.crm4.dynamics.com/api/data/v8.0/ – it is giving me full table but data is not updated.
https://.api.crm4.dynamics.com/api/data/v8.1/ – it is giving me full table but data is not updated.
https://.api.crm4.dynamics.com/api/data/v8.2/ – it is giving me full table but data is not updated.
https://.api.crm4.dynamics.com/api/data/v8.9/ – it is giving me full table but data is not updated.
related table has no data or old data.
I mean currently i have 100 records (in the UI) but in the table it is showing only 5 records.
Could you please guide me, how can I fix this problem
—
Thanks
Mohammad Shahnawaz
Kindly post your question at http://community.powerbi.com/.
Follow few tutorials of PowerBI, rather implementing PowerBI directly.